


They were a festive accent to the party... and in about 8 months, they'll make cute little outfits for the new baby.
This DIY project was super easy.
Here's how I did it...
I bought a 5-pack of white Gerber onesies at Michael's for $10.99...

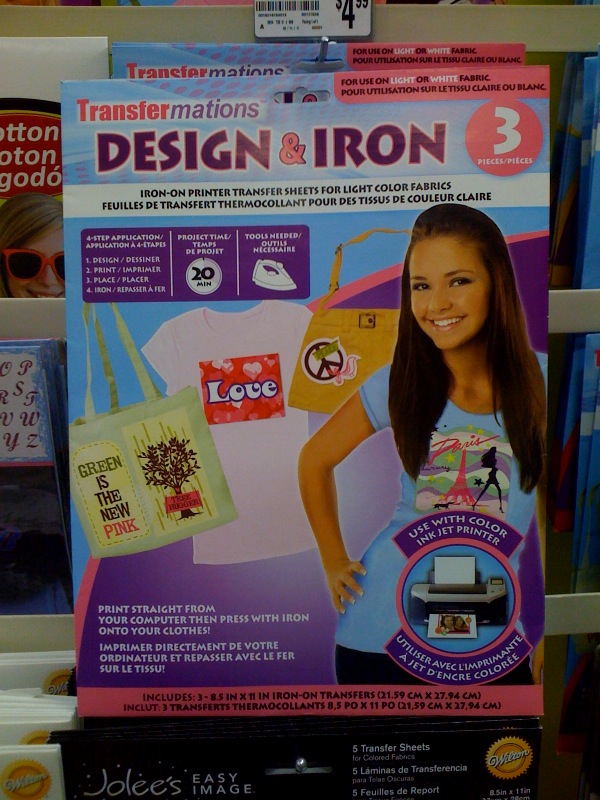
And a pack of iron-on transfer sheets for $4.99...
Once I was back in my office, I opened the pack of onesies and got to work. On the computer, I created four different onesie designs. I used Adobe Illustrator, but any basic program would work (I've said it before, but Microsoft PowerPoint is a really versatile program that let's you import images, manipulate text, etc. You could easily use PowerPoint if you don't have any fancy programs like Adobe Illustrator)
So, here's what I came up with...
I created four designs-- repeating the Bumble Bee to create a symmetrical look and emphasize the "Bb" theme:

Then-- this step is KEY-- I flipped each image so that it would print out correctly onto the transfer paper. Flipping images in Illustrator is easy, but if you're using PowerPoint you'll need to go into "Format" and under the tab "Rotate" click "flip vertical". It's as easy as that. When you're done flipping, each one looks like this:

Load your printer with transfer paper, and hit "print". Once printed, I cut out each design, getting my scissors as close as possible to the graphic. I didn't want a lot of extra transfer paper around the design-- by cutting each image close, you'll create a clean transfer that's more professional looking.
Place each cut out with the image side down:

image is centered and ready for a hot iron

I ironed and ironed and ironed again. It took several sessions to get each image to stick.

once the transfer has completely cooled, carefully peel off the backer paper.
And, that's it.


Adorable custom onesie.
*hand wash in cool water, and line dry*
...


No Comments Yet, Leave Yours!
Thanks for this DIY! I know its super easy but I've been looking for some guidance in doing this myself. Your shower and ideas are so cute and easy! Thanks for the hard work you put in to your blog!
What a gorgeous baby shower! you are an amazing graphic designer & party planner! :) Love the customize onesies! thanks so much for the instructions! all the best!
mel :)
so cute..love this idea...love them hung on the clothes line too...
maureen
This is a great idea! and when I tried to do it myself.. i couldn't get the things to flip the right way.. they just flipped upside down instead of the way it shows.. any help?
Would you be willing to share or sell your images? I am hosting a baby shower for my sister with a bee theme and I would love to make these onsies.
Would you be willing to share or sell your designs? I am hosting a baby shower for my sister with a bee theme and I would love to make these onsies.
Thanks.
Post a Comment