Showing posts with label my house. Show all posts

Tuesday, December 17, 2013

Life Lately


A quick shot of Friday's afternoon pick up at the store.  High Street Market is crazy busy, fulfilling holiday orders (and will continue to do so until 12/23-- our LAST OFFICIAL SHIPPING DAY of the season).


 Winter Wonderland.  We received a bunch of new snow here in Philadelphia.  It's been pretty magical.  This picture was taken from the car, on a road near our home (I wasn't driving).  Nothing like fresh snow to get you in the Christmas spirit.  :)


 I decorated the new carriage house with simple (cheap) green wreaths and huge red bows.  It took me about 5 minutes to hang these and they make me SO HAPPY every single time I pull my car up.


The cozy living room sofa --  my favorite spot in the house.
(cable knit pillows are from our store, and available here)


an unstyled instagram pic of our Christmas tree (which clearly needs a star topper!)


Also, last week, William experienced his first snow!  We only had him out there for about two minutes, but obviously he was not impressed.  :)


William is about three months old now.  And, life as a new mom is really good.  Very different, but wonderful all the same.  Besides the NO SLEEP (and I like writing it in all capitals, because it's THAT MAJOR)... besides the NO SLEEP, the biggest change in my life is the amount of smiling I do every day.  Seriously.  I don't think I've ever smiled so much.  So much smiling that my cheeks hurt, that's how much smiling.  :) :)  :) William makes me really happy.  When your child smiles at you, your heart literally melts into a gob of warm mushiness.  And, you will do anything to get him to do it again.  Sing silly songs, make funny faces, and give that wet mouth a million kisses.  I will do anything for a good, gummy, toothless smile.  It's the best thing in the world.  :)

Oh. And, the other biggest change in my life-- I'm constantly dealing with pee, poop, puke, and the smell of spoiled milk.  Also, LAUNDRY.  Lots of laundry.

Here are some recent pictures of my loveable, smiley, precious little poop machine.  :)


Love this tiny bear


William on Thanksgiving, smiling at Grandma who was standing over my shoulder.  :)


And, one more picture...


...


Tuesday, September 3, 2013

So, it's September...

I can't believe this month is finally here.  9 months of pregnancy-- check.  


2013 has certainly been the fastest year of my entire life.  Without a doubt.  Between the pregnancy, our growing business, design clients, and our 3rd floor renovation (whew!), this year is flying by so fast.  And now, in just a matter of days, we are about to welcome our first baby into the world (official due date is September 14th).  It's kind of mind blowing.  With all the days of your life...  and, only a handful of days remain between "before kids" and "after kids".  Nearly 6 years of marriage and we are about to become parents (what?).  And, even though my hormonal self has had 9 months to adjust to this exciting transition, the concept is still equally astounding.  :)


An update on our project:  the 3rd floor renovation is now completely finished and for the last couple of weeks, I've been working to furnish the space.  I've been buying rugs, installing new bedding, pulling hoarded vintage furniture out of storage, and getting everything set up.  It's a great feeling...  especially, when I'm reminded that not too long ago, the 3rd floor looked like this.  But, we now have two guest rooms with walk-in closets and each bedroom holds a queen-sized bed.  Between the two guest rooms is a tiny little room with two large windows that face the front of the house.   Here's the floorplan:


Some of you have emailed me asking about our living situation.  Here's the deal: we've decided to bunk up on the 3rd floor while we finish the renovation on the 2nd floor.  It feels a little backwards, but I'm so BEYOND HAPPY with the way that the 3rd floor turned out, I want my entire house to feel this way.  So, I don't mind waiting.  :)  Living on the 3rd floor is hardly a sacrifice, for now.  The three of us (baby included) will be living up there over the winter months and most likely into the spring/summer 2014 (I feel like I should write an entire post about living through a massive home renovation-- and I probably should.  But, I'll save that topic for another time).  Dave and I will sleep in one of the guest rooms, and baby will live in the tiny front room.  Even though the permanent nursery will eventually reside on the 2nd floor, I've decided to do my best and design his temporary little room in the meantime.  Here is my inspiration board for the nursery:


 The vintage bamboo armoire (that I've been hoarding for years now) won't fit in this 3rd floor space, so that will have to wait until the 2nd floor is complete.  But, almost everything else managed to squeeze into that tiny room! 
 

I wanted to keep the palette soft and a little bit grown up...  so, I stayed away from overly saturated colors and used soft shades of blue, mint, bright whites and warm tans...  with a pop of emerald green for contrast.  The walls are Farrow & Ball "James White" so the vibe is really bright and warm.


If you follow me on Instagram, you've already seen a couple of sneak peeks.  But, here are some additional photos of the space as it comes together...


 (drawer organizers from Ikea-- go buy them, they'll change your life)


We are still waiting on our glider, so once that arrives I will post some additional photos of this precious little room.  :)  In the meantime, we're on baby watch.  


...

Friday, August 23, 2013

3rd Floor Lighting Selections

Having the electrician run all new wiring to the 3rd floor was one of the most exciting parts of this renovation.  Not glamorous and not cheap, but totally amazing nevertheless.  When we bought the house, the walls on this level were crumbling, the wiring was all the original 19th century knob & tube, and it was freezing from a lack of insulation.  I'm happy to say that today, this space is beautiful and warm and we have LIGHT.  And, power outlets.  And, dimmers.  And enough electricity to power a television, plenty of chargers, lamps, and even a vacuum without blowing a fuse.  I'm so happy.  :)


The ceilings in the bedrooms are a little bit low (just under 8 feet).  So, we decided against ceiling fixtures in these spaces and went with recessed cans instead.  I realize that recessed cans aren't EXACTLY historically accurate when we're talking about an 1890s home, but I'm happy we made the choice to use cans.  Very happy, in fact.  They're so discreet and I adore the low profile look.  And, they cast the most GORGEOUS light.  


I chose the 3" LED Recessed Gimbals (which are dimmable) by Lithonia.  They're so tiny and simple, you hardly notice them.  And the light they give off is beyond beautiful.  We used three in the large bedrooms, two in the smaller bedroom, and one in each closet.  Together with ambient lighting (table lamps, etc), they will provide lovely light to each space.  For recessed cans, they're pretty cool.  They claim to use hardly any electricity and you won't have to change the bulb for about 25 years.  All of that is just a bonus because what really matters to me is how pretty they make the space look.  :)  SO, if you're looking at recessed fixtures for your renovation, I highly recommend these.  The Robsons give them two thumbs up.


my 3rd floor hallway inspiration board -- 
very simple, very bright, still feeling historically significant


In the center hallway, we wanted to stick with a more traditional/historical lighting plan: one central fixture outside the bedrooms, and one pendant over the stairs.  We also added a pair of sconces to create additional light in the stairway.  We had everything set on dimmers (I'm obsessed), and we wanted these fixtures to feel like they belonged with our 1890s home.  So, they couldn't feel too modern...

First, we decided on the pair of sconces for the stairway:


We both love this simple sconce, so it was a done deal.


Next, we looked at a series of pendants/chandeliers that would coordinate with the sconces.  Something casual?  Or, something a bit more fancy?  Here's what we considered...


bottom row: Paris Flea Market Chandelier, Large Alabaster Globe Pendant, Westport Chandelier


For the hallway fixture (that would sit between the bedroom doors), we selected these options...


This is the 3rd floor after all, so the fixtures didn't need to be that fancy...  But, we didn't want it to feel boring either.  My husband has a clear opinion when it comes to lighting, and I appreciate his perspective.  So, we had to work together on this one.  We matched up EVERY suitable combination (something fancy with something casual, etc, etc), and in the end, we decided to go with this grouping...


We love this group!  The "Vendome" sconces arrived this week and will be installed this weekend, but here is what the hall is looking like now (sans sconces)...


more updates to come...

...


Thursday, August 15, 2013

3rd Floor: Refinished Hardwood Floor DIY


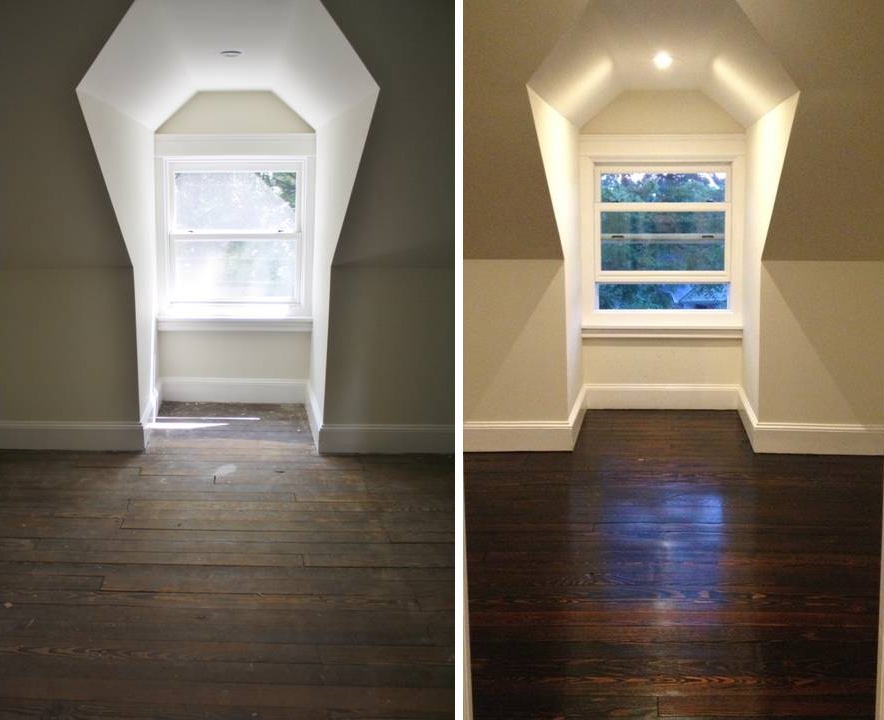
Cross it off the list-- our 3rd floor hardwoods have been refinished!!  And, they're drop dead gorgeous.  Words cannot describe how happy we are with the outcome.  My industrious husband, Dave, did everything from start to finish.  And, his obsessive attention to detail really shows.  The refinished floors look terrific.  :) 

Just to refresh, here are some pics of the floors from last month (at this point, we had finished the wainscoting, hung the trim, and painted everything)...


As you can see, the floors were in rough shape but worth saving (some areas were worse than others).  Our center hallway was covered in a dark shellac, and the hardwood in the bedrooms was completely unfinished.  We did a little bit of research on removing the shellac and came up with mixed reviews.  Most people concluded that it would be a BEAR to remove-- some suggested stripping the floors, others suggested going through countless sheets of sand paper.  The shellac sort of  looks like paint.  It's opaque, yet it has a lighter/thinner finish.  When you try to remove it, it feels almost like tar and tends to gum up the sander.  But, Dave decided to sand it off (rather than strip the floors) and ended up with decent results!  We were pleased.  So, if you have shellac on your floors, don't worry.  It can be removed with little to no damage.  The floors in the hallway look AMAZING now.  Who would have known that all that gorgeous graining was hiding underneath a layer of ugly shellac all these years?

...

Our DIY project can be broken down like this:

step 1:
Prep your floor -- pull any nails or staples, address the gaps between planks (either fill with wood filler or replace planks entirely).  Make sure to secure any loose boards.  When you're finished, vacuum the space thoroughly.

step 2:
Sanding-- we rented a drum sander from the Home Depot to sand the majority of the floors.  Then, Dave used an edging sander to get near the walls and corners-- places that the drum sander can't reach (if you have spaces where even the edging sander can't reach, you'll need to use a paint scraper to remove that layer of old finish).  He started with a 36 grit paper and went over the entire floor, following the grain of the wood.  This rough grit will aggressively remove the top layer of wood (our floors needed it!).  When he was finished, he repeated this step with a 60 grit sand paper.  And then, finished using the 100 grit paper.  By going over the floors three times with the drum sander and the edger (using a gradual progression in sand paper every time) you will create a smoother, more even finish.  And, your hardwoods will be better prepared to accept the stain.

drum sander


step 3: 
Popping the wood (this is an optional step, but we did it, so I'm including it as "step 3") -- lightly mist the floor with water from a pump sprayer (something like this).  Do not over water, since this can create water stains.  Just lightly LIGHTLY spray it.  The water will open up the grain to allow for a better buffing, which happens in the next step...

step 5: 
Blend the edges -- use a vibratory sander (we rented one from the Home Depot) to blend the areas where the edger and drum sander met.  Dave used 100 grit sand paper.  By blending (or buffing) the two spaces you will create a seamless finish.

step 6:  
Clean up -- vacuum the entire floor to make sure that you've cleaned up all the dust and debris (we did this twice with the shop vac).

step 7: 
Stain -- now it's time to apply that beautiful stain!  We selected oil-based Minwax "Jacobean" stain, which can be found at any Home Depot store.  We wanted a dark floor that complemented the tone of our original banisters.  "Jacobean" was the perfect fit for us.  Dave applied the stain with a natural bristle paint brush, and immediately followed with a rag (we used an old t-shirt) to remove excess stain.  Wiping the excess with a rag will allow the wood grain to shine through.  Allow the stain to dry for at least 24 hours.

"Jacobean"


checking our sample piece with the original banister finish-- it's a winner.


 applying the stain


step 8:
Polyurethane -- the final application!  Apply 1 coat of polyurethane (we used Lenmar Polyurethane Wood Finish in "satin").  We used a roller with a 3/8" nap, and then used a brush to get in the corners.  Allow approx. 12 hours of drying time.  After the poly has dried, sand it with a 220 grit sand paper.  Now, REPEAT this step 3 times.


step 9:
Wait -- wait for the final coats of polyurethane to completely cure before moving furniture (or area rugs) onto the floor.  RESIST!  It's very difficult to be patient, but trust me.  The poly needs to fully cure. We let it sit for almost a week, just to be safe.  But, you could get away with 3-4 days of drying time.

...


And, here is what the refinished floor looks like today:


a little "before & after" comparison...


I'll be back tomorrow to talk about the lighting we selected for this space.  So excited to share the final selections.  :)

...


if you're interested, a few previous blog posts on this 3rd floor renovation...


...

Related Posts Plugin for WordPress, Blogger...