
Cross it off the list-- our 3rd floor hardwoods have been refinished!! And, they're drop dead gorgeous. Words cannot describe how happy we are with the outcome. My industrious husband, Dave, did everything from start to finish. And, his obsessive attention to detail really shows. The refinished floors look terrific. :)
Just to refresh, here are some pics of the floors from last month (at this point, we had finished the wainscoting, hung the trim, and painted everything)...

.JPG)


As you can see, the floors were in rough shape but worth saving (some areas were worse than others). Our center hallway was covered in a dark shellac, and the hardwood in the bedrooms was completely unfinished. We did a little bit of research on removing the shellac and came up with mixed reviews. Most people concluded that it would be a BEAR to remove-- some suggested stripping the floors, others suggested going through countless sheets of sand paper. The shellac sort of looks like paint. It's opaque, yet it has a lighter/thinner finish. When you try to remove it, it feels almost like tar and tends to gum up the sander. But, Dave decided to sand it off (rather than strip the floors) and ended up with decent results! We were pleased. So, if you have shellac on your floors, don't worry. It can be removed with little to no damage. The floors in the hallway look AMAZING now. Who would have known that all that gorgeous graining was hiding underneath a layer of ugly shellac all these years?
...
Our DIY project can be broken down like this:
step 1:
Prep your floor -- pull any nails or staples, address the gaps between planks (either fill with wood filler or replace planks entirely). Make sure to secure any loose boards. When you're finished, vacuum the space thoroughly.
step 2:
Sanding-- we rented a drum sander from the Home Depot to sand the majority of the floors. Then, Dave used an edging sander to get near the walls and corners-- places that the drum sander can't reach (if you have spaces where even the edging sander can't reach, you'll need to use a paint scraper to remove that layer of old finish). He started with a 36 grit paper and went over the entire floor, following the grain of the wood. This rough grit will aggressively remove the top layer of wood (our floors needed it!). When he was finished, he repeated this step with a 60 grit sand paper. And then, finished using the 100 grit paper. By going over the floors three times with the drum sander and the edger (using a gradual progression in sand paper every time) you will create a smoother, more even finish. And, your hardwoods will be better prepared to accept the stain.
.JPG)
drum sander
step 3:
Popping the wood (this is an optional step, but we did it, so I'm including it as "step 3") -- lightly mist the floor with water from a pump sprayer (something like this). Do not over water, since this can create water stains. Just lightly LIGHTLY spray it. The water will open up the grain to allow for a better buffing, which happens in the next step...
step 5:
Blend the edges -- use a vibratory sander (we rented one from the Home Depot) to blend the areas where the edger and drum sander met. Dave used 100 grit sand paper. By blending (or buffing) the two spaces you will create a seamless finish.
step 6:
Clean up -- vacuum the entire floor to make sure that you've cleaned up all the dust and debris (we did this twice with the shop vac).
step 7:
Stain -- now it's time to apply that beautiful stain! We selected oil-based Minwax "Jacobean" stain, which can be found at any Home Depot store. We wanted a dark floor that complemented the tone of our original banisters. "Jacobean" was the perfect fit for us. Dave applied the stain with a natural bristle paint brush, and immediately followed with a rag (we used an old t-shirt) to remove excess stain. Wiping the excess with a rag will allow the wood grain to shine through. Allow the stain to dry for at least 24 hours.

"Jacobean"
.JPG)
checking our sample piece with the original banister finish-- it's a winner.
.JPG)
applying the stain
.jpg)
step 8:
Polyurethane -- the final application! Apply 1 coat of polyurethane (we used Lenmar Polyurethane Wood Finish in "satin"). We used a roller with a 3/8" nap, and then used a brush to get in the corners. Allow approx. 12 hours of drying time. After the poly has dried, sand it with a 220 grit sand paper. Now, REPEAT this step 3 times.
.jpg)
step 9:
Wait -- wait for the final coats of polyurethane to completely cure before moving furniture (or area rugs) onto the floor. RESIST! It's very difficult to be patient, but trust me. The poly needs to fully cure. We let it sit for almost a week, just to be safe. But, you could get away with 3-4 days of drying time.
...
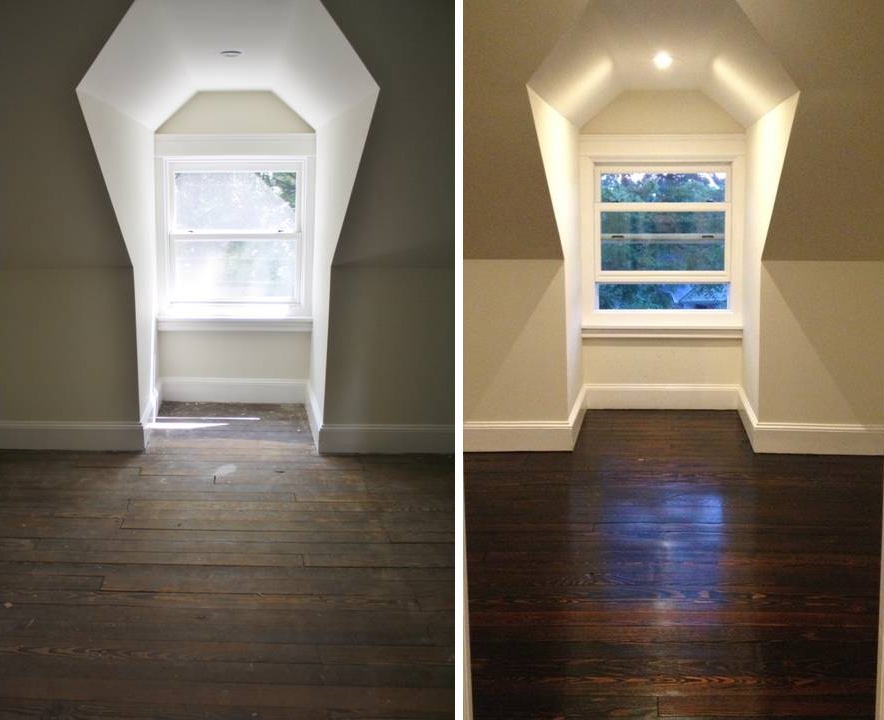
And, here is what the refinished floor looks like today:


.JPG)
a little "before & after" comparison...


I'll be back tomorrow to talk about the lighting we selected for this space. So excited to share the final selections. :)
...
if you're interested, a few previous blog posts on this 3rd floor renovation...
...


.JPG)
.JPG)
No Comments Yet, Leave Yours!
The hardwork has definitely paid off! The floors look amazing. Now, sit back and enjoy your 3rd floor!
WOW!! SO awesome!!!
Your DIY house renovation is so inspirational and gives me hope for my own 100 year old farm house. The floors and wainscoting are beautiful! I cannot wait to see how you finish off the interior with your impeccable style.
Looks stunning! And the stairs look so much better without those finials!
Stunning! Do you just want to sit on the floor all day and stare?
WOW, what a phenomenal job!! I hope you're able to relax now before baby comes!!! :)
This is quite a stupendous effort. Was searching online for drywall insulation for my home when I stumbled upon this. This is quite inspiring and thanks a lot for sharing.
you guys must be SO. PROUD. it looks absolutely amazing!! can't wait to see how you dress it.
loving the fixture you chose for the landing! ox
Look gorgeous!
Stunning, just stunning! I love the darker colour as well, looks great with the classic style of your home. Wonderful job, well done!!
Wow! I can't believe the difference. I might try this method in updating my flooring in Calgary. I think this will really help the look of my house.
The dark hardwood stain looks great with the light colored walls! I wholeheartedly agree; it is gorgeous! The Polyurethane really gave it that shiny and polished finish that really made the hardwood stand out.
This looks great! I have been looking at getting into new hardwood floors. I love the dark color and would love something like this in my place.
Earl Judds
http://www.carpetsplusca.com/index.php/products/hardwood-floors
Wow, your floors look fantastic! Incredible job. I love the dark finish you chose.
Looks amazing, also i like the shapes of your house. Great job guys
Those pictures are amazing. I love how it turned from a very old looking floor to a very modern looking floor and I seriously love the color.
I wanted to get a hardwood floor for my house (I had laminate before) and I looked at this website right here - www.pidfloors.com
One of the products look very similar to your refinished floor - http://pidfloors.com/?product=carbon-fiber
Wow! Wonderful job! I have been refinishing hardwood floors for years and you have done a great job. For future food for thought for you, the way we apply stain is with a buffer and a carpet circle.
You literally take a piece of carpet, pour stain directly onto the carpet, place it underneath the buffer and buff in the stain. WAYY quicker, you use much less stain, and it applies a much more even stain. You do have to "cut in" the edges and corners by hand but the rest, you can fly through.
Well done!
www.thefloordoc.com
That floor turned out amazing. It is so interesting that modern tools can transform that floor from a bygone time to today. The floors in my home need to be redone and I had been stressing about it. I'll be coming back to your blog for tips for sure.
http://www.laceyscarpet.com
Awesome post for those who want Wood Flooring Refinishing
Thanks for sharing
For me personally, I love the look of hardwood flooring in a home. There is a sense of class and style that comes with it that makes a home look really good. The cool part about hardwood flooring is that there are so many different types to choose from. It's just a matter of finding one that looks good with your home or business.
http://www.carrollfloor.com/Laminate-Flooring-Hardwood-Flooring-Versailles-KY.html
Love how you turned those old hardwood floors into almost brand new looking floors. Instead of tearing up the floor and putting an all new one you decided to refinish the wood. That must have saved a lot of time, as well as money. Also the dark brown stain you picked has to be the best color I have seen on a floor in a long time. Thanks for sharing your hardwood floor pictures. http://www.surplussalesinc.com/hardwood.html
Really nice tutorial! Perfect documentation and guidance for first timers.
Hardwood floors add a beautiful, elegant, natural element to any home. In addition, they add value to your home and are popular in the resale home market.
Hardwood is often installed throughout the house for a seamless look. Though hardwood lasts for years, you can get fresh looks down the road by refinishing, staining, and even painting the kitchen floors.
It's so amazing to read your article about refinishing hardwood floors. I'm glad I visit your blog. Thanks for sharing very trueful story.
You did an awesome job!! The floors look amazing. Yes, resist the temptation of putting things on the floors too soon...and that's very hard, but a definite need. Thanks for sharing.
Nice post,
Wow, great article.Really thank you! Keep writing. And thank you for sharing nice pics of hardwood flooring.
Thanks
hardwood floors refinishing charlotte
You've done a good job. Awesome Flooring. This is very beautiful and shiny. I love those. Keep a nice work. Thanks again.
You've done a good job. Awesome Flooring. This is very beautiful and shiny. I love those. Keep a nice work. Thanks again.
I came for the Turkish Corners and stayed for the floors :)
Amazing job, and it shows how well old floors respond to refinishing, although doing the floors before installing the baseboard would have been easier.
I appreciated this blog! Keep up the good work. I have gotten some good information here. thanks for it. We also offer Parquet floors London at affordable price.
Knock...Knock!! Dreaming of shining hardwood flooring? Don’t worry, here we are introducing - L&C Pro Floors to help you with your dream to refinish hardwood floors .
Thanks for sharing..
This looks great!
these floors look excellent, thanks for sharing this information
I kept telling my parents this was doable without having to sell your kidney. They ended up taking up their hardwood and replacing it with a wood like tile in the living and family rooms. It looks really good but it doesn't give off that warm feeling that wood does. You all did an excellent job. I wish i would have shown my parents this before the started!!
I kept telling my parents this was doable without having to sell your kidney. They ended up taking up their hardwood and replacing it with a wood like tile in the living and family rooms. It looks really good but it doesn't give off that warm feeling that wood does. You all did an excellent job. I wish i would have shown my parents this before the started!!
Wow , amazing change !
Nice work !
Hi! I learned a lot in your blog site. Very informative.Knock...Knock!! Dreaming of shining hardwood flooring? Don’t worry, here we are introducing - L&C Pro Floors to help you with your dream to refinish hardwood floors .
Definitely, what an outstanding website full of informative posts, I will surely bookmark this site. floor refinishing new york
You've all worked hard on this flooring, and it resulted in something beautiful. The flooring has a country touch. It is also easy to clean and your child can play on it safely.
hardwood floors refinishing charlotte
Wow, great article.Really thank you! Keep writing.
This is one of the most wonderful blog, this is work is tremendous. Thanks
Flooring Contractors
This is one of the most wonderful blog, this is work is tremendous. Thanks
hardwood floor installation
I like the looks of hardwood floor.
but does vinyl floor look just as good?
Hardwood Flooring Barrington IL
Post a Comment